
How to Record Screen on iPhone 13: A Comprehensive Guide
Recording your iPhone 13 screen can be a useful tool for a variety of purposes, from creating tutorials to sharing your gameplay with friends.
However, if you’re new to iOS or the iPhone 13, you may be unsure of how to record your screen. In this article, we’ll walk you through the steps to record your screen on iPhone 13.
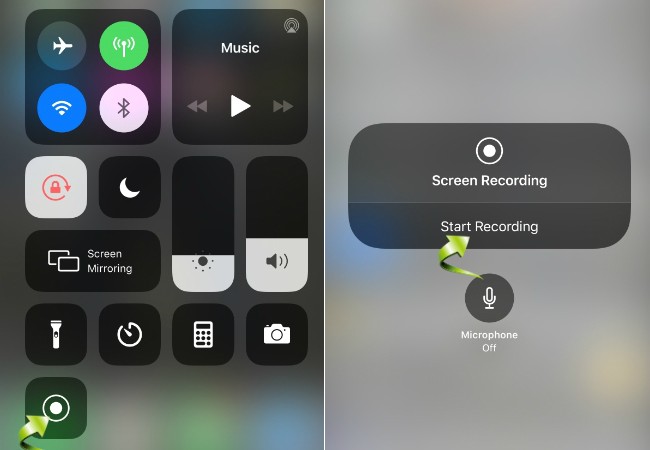
Table of Contents
- Why Record Your iPhone 13 Screen?
- Preparing to Record Your iPhone 13 Screen
- How to Record Your iPhone 13 Screen with Built-in Screen Recording
- How to Record Your iPhone 13 Screen with a Third-Party App
- Tips and Tricks for Recording Your iPhone 13 Screen
- Troubleshooting Recording Issues
- Conclusion
- FAQs
Why Record Your iPhone 13 Screen?
Recording your iPhone 13 screen can be beneficial for various reasons. Here are some examples:
- Creating video tutorials
- Recording gameplay to share with friends or for streaming
- Capturing important conversations or events
- Providing technical support
- Sharing demonstrations or presentations
Preparing to Record Your iPhone 13 Screen
Before you begin recording your screen, there are a few things you should do to prepare:
Check Your Storage Space
Recording your screen requires storage space on your iPhone. Ensure you have enough storage space by checking your available storage.
Check Your Battery Level
Recording your screen can drain your battery quickly, especially if you’re recording for an extended period. Ensure your iPhone has enough charge to complete the recording by checking your battery level.
Enable Screen Recording in Control Center
To use the built-in screen recording feature on iPhone 13, you’ll need to enable it in Control Center. Here’s how:
- Open Settings and select Control Center.
- Tap Customize Controls.
- Scroll down to find Screen Recording and tap the green plus button next to it.
How to Record Your iPhone 13 Screen with Built-in Screen Recording
Once you’ve prepared your iPhone for recording, you’re ready to start recording your screen using the built-in screen recording feature.
- Swipe down from the upper-right corner of your iPhone 13 to open Control Center.
- Tap the Screen Recording icon, which looks like a circle surrounded by another circle.
- A countdown of three seconds will begin, after which your screen will begin recording. A red bar will appear at the top of your screen to indicate the recording is in progress.
- To stop recording, tap the red bar at the top of your screen and select Stop.
How to Record Your iPhone 13 Screen with a Third-Party App
If you prefer to use a third-party app to record your iPhone 13 screen, there are several options available in the App Store. Here are a few popular ones:
- AZ Screen Recorder
- DU Recorder
- TechSmith Capture
- Camtasia
Once you’ve downloaded and installed the app of your choice, follow the app’s instructions to begin recording your screen.
Tips and Tricks for Recording Your iPhone 13 Screen
- Use a stable surface or tripod to avoid shaky footage.
- Avoid recording in loud or busy environments.
- Use headphones to improve audio quality.
- Edit your video to add captions or highlights.
- Consider using an external microphone for better audio quality.
Troubleshooting Recording Issues
If you encounter issues while recording your screen, here are a few things you can try:
- Check your storage space and battery level.
- Restart your iPhone.
- Disable and re-enable screen recording in Control Center.
- Update your iPhone and the app you’re using to record.
Conclusion
In conclusion, recording your iPhone 13 screen is a straightforward process, whether you choose to use the built-in screen recording feature or a third-party app. With the tips and tricks outlined in this article, you can ensure that your recordings are of high quality and meet your specific needs. By following the steps outlined in this article and experimenting with different techniques, you can create engaging and informative content that showcases the unique features of your iPhone 13. Whether you’re creating tutorials, capturing memorable moments, or sharing gameplay, recording your iPhone 13 screen can help you achieve your goals and share your experiences with others.